
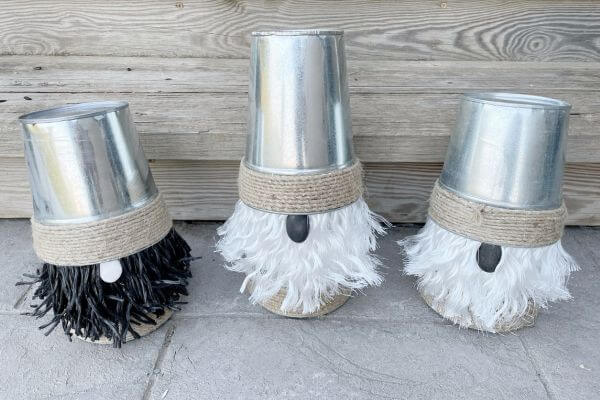


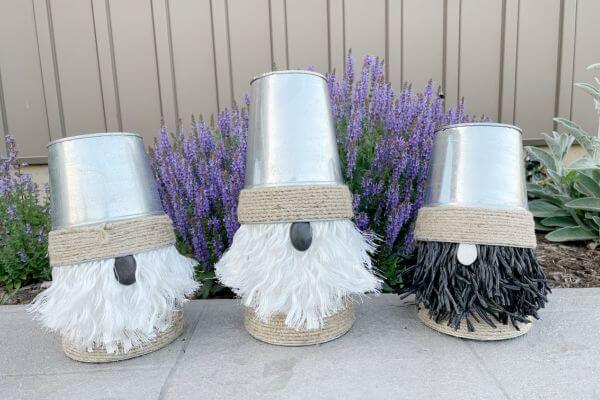
These cute, industrial-looking gnomes made of galvanized vases from Dollar Tree are a perfect decoration for your garden!
When I saw these galvanized vases in the garden section of Dollar Tree, I just had to pick up a few! They had both taller and shorter versions with jute twine already glued around the top, and I had recently made a gnome made of terracotta pots.
So, I immediately thought maybe a garden gnome would be a cute idea. I wanted something that I’d be able to put outside in the garden or mulched area around my house.
I then went looking for something that I could make a beard out of that wouldn’t get all soggy and gross immediately after putting these Dollar Tree gnomes outdoors.
There was poly rope in the automotive section of Dollar Tree that looked like it could survive the outdoors, and I initially picked up the white version of this rope.
However, when I went back again to look for more, I noticed that they had a black-colored version too. I figured, why not make two versions of this outdoor garden gnome?
For the first gnome, I used two of the taller galvanized vases. For the second one, with the black beard, I used two of the shorter galvanized vases.
And did you know that gnomes are supposed to protect your garden? So, these guys are multi-functional. They look cute in an industrial sort of way and guard your garden and landscaping! 😉
Read on for this Dollar Tree gnome tutorial that’s perfect for your garden and outdoor spaces!

Supplies for Dollar Tree Gnome for the Garden Version #1
This post contains affiliate links. As an Amazon Associate, I earn from qualifying purchases. This means when you click a link, I may earn a small commission at no cost to you. This helps me to run this website. Thanks in advance for your support!
All materials are from Dollar Tree except the scissors, glue gun, wire cutters, and mod podge.

- 2 Galvanized Vases (for this gnome I used 2 of the taller, thinner vases)
- Scissors
- Black River Rocks
- Dishwasher Safe Mod Podge
- White Twisted Poly Rope (25 feet)
- Wire cutters (like mine)
- Glue Gun
Just a note that online the shorter galvanized vases are labeled as 5.5 inches and the taller ones are labeled as 5 inches. It’s referring to how wide the vase is and not the height.
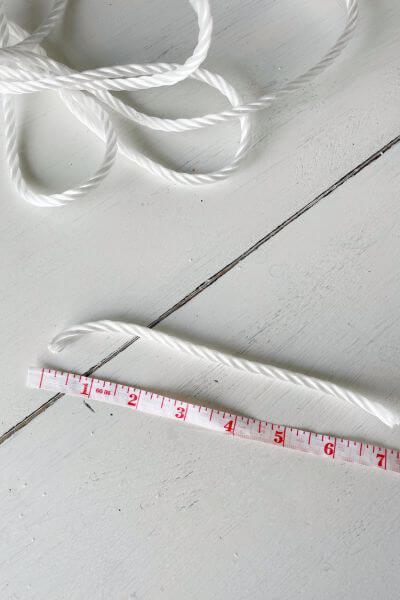
First, Cut the White Poly Rope into Pieces
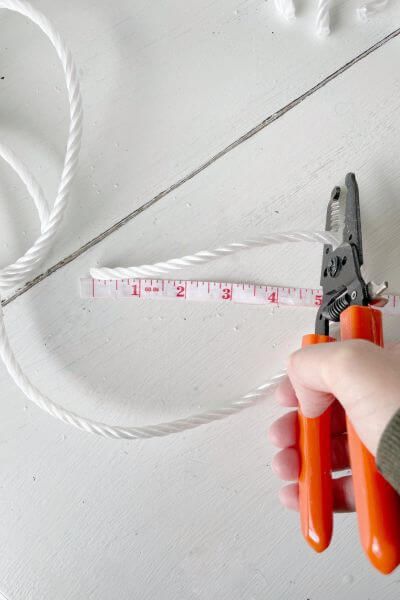
Begin by cutting your white poly rope into 7-inch pieces. I had to use my wire cutters because this stuff is tough to cut through!
I cut about 10 strands of these 7-inch pieces.
Cut the remainder of the poly rope into 5-inch strands. These were not exactly 5 inches, they were approximate since I cut the first one and then used it for reference to cut the rest of them.
After you’re done with cutting all the pieces (Phew!) then we can move on to the next step.
Glue the Rope Strands onto the Bottom of the Galvanized Vase
Start by turning your vase upside down and then figure out where the seam is (this will be the back of your outdoor gnome).
Hot glue the ten 7-inch strands of poly rope onto the bottom of the galvanized vase, toward the front end of your garden gnome (see the first picture below). These will be a little longer to create the beard.
Then begin gluing the 5-inch strands of rope around the entire circumference of the gnome.


Continue Hot Gluing the Remainder of the Strands
Continue to glue the remainder of the 5-inch poly rope all around the bottom of the galvanized vase. Fill in all the gaps, some rope strands will be glued on top of the others.
I glued some on top of the 7-inch strands too to fill out my gnome rope beard.
The second picture below is how the galvanized vase looked after all the rope pieces are glued on there!


Wait for the hot glue to dry and then on to the next step! 🙂
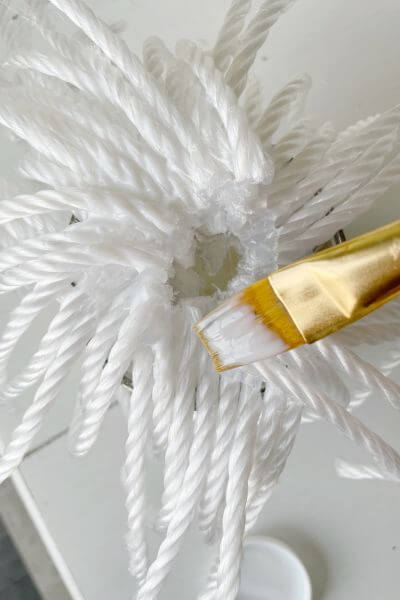
Use Dishwasher Safe Mod Podge to Coat the Rope Strands
This is an extra step I added to attempt to make the garden gnome more water-resistant for outdoor use.
I used dishwasher-safe mod podge and applied it over the rope pieces that were secured with the hot glue.
Then I allowed the mod podge to dry overnight. I think you could speed up the process using a blow drier.

Glue the Second Vase to the Rope to Make the Gnome Hat
Using the dishwasher-safe mod podge, place a thick line of it around the inside lip of the other galvanized vase.
Then (keeping the seam toward the back), push the galvanized vase onto the rope beard. Tilt it a little toward the back, so you can see the rope beard better.
The front part which is the beard, should contain the 7-inch and 5-inch pieces. The ones in the back are all 5-inch ones. Feel free to mix this up though! This is just how I created mine. 🙂

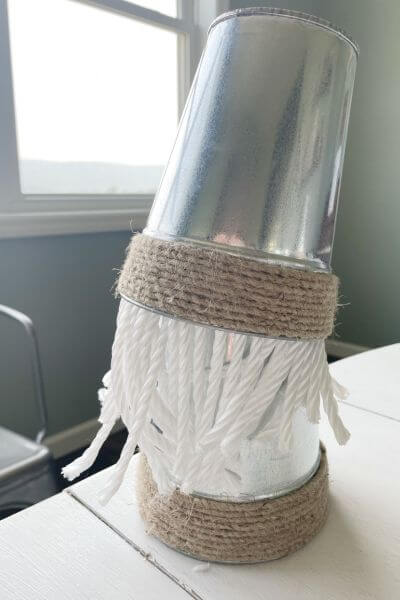
This is how the gnome is shaping up so far!
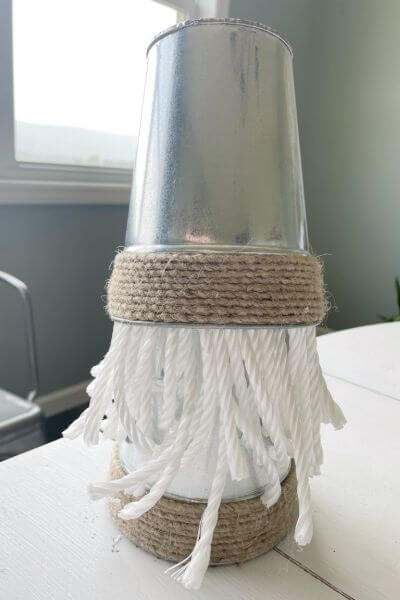
Separate the Strands to Make the Beard and Hair Bushier
I got the idea to separate the strands using my finger after I had cut some rope and the little fibers were scattered all over my table. It definitely added to the gnomey-ness since the full rope strands alone didn’t look too hot! 😉
Separate the strands with your fingers until the beard and hair of your gnome are fuller and bushier, as shown in the second picture below.
If the glue holding the gnome hat on isn’t dry yet, be sure to hold the hat on while you are separating the rope.

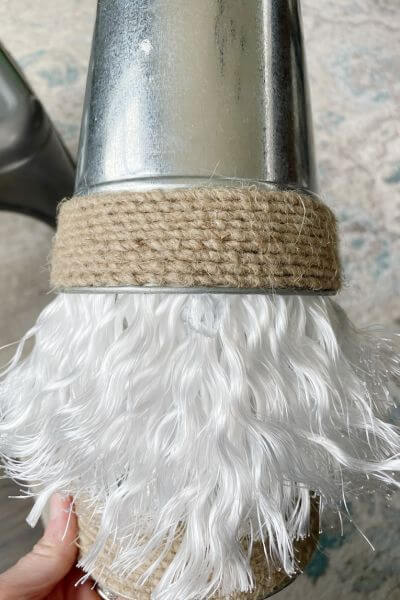
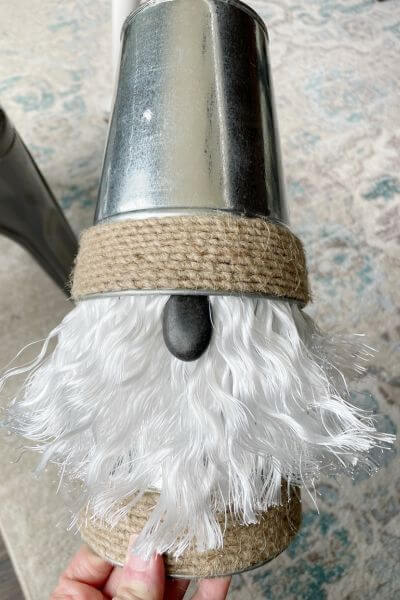
Hot Glue the Rock Nose to the Gnome Beard and Hat
Place a glob of hot glue onto the rope beard right below the rim of the hat. You can place some up under the hat too, to make the nose more secure.
Then place your black river rock onto the glue pushing it up under the galvanized vase hat a little bit to make the gnome nose!
During this step, I held the gnome horizontally, so that the hot glue wouldn’t run down the beard.
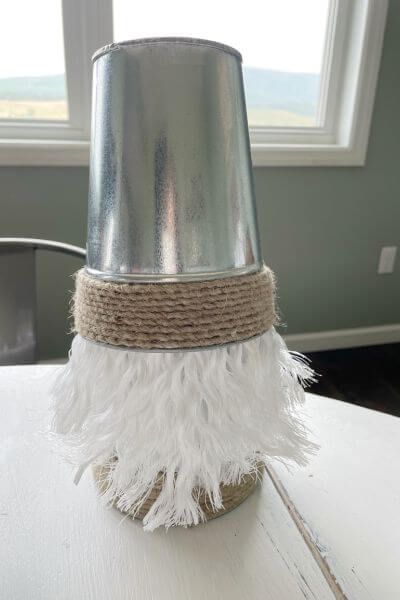
Trim up the beard a bit using your scissors, and this garden gnome is completed!
But wait, there’s more! Read on to see the next garden gnome made with the two shorter galvanized vases and black poly rope!
Supplies for DIY Dollar Tree Garden Gnome Version #2
All materials are from Dollar Tree except the scissors, glue gun, and mod podge.

- 2 Galvanized Vases (for this gnome I used 2 of the shorter, fatter vases)
- Scissors
- Dishwasher Safe Mod Podge
- White River Rocks
- Black Poly Rope (50 feet)
- Glue Gun
- Ignore the wire cutters, I didn’t end up using them for this gnome, because the black rope was easier to cut.
Cut the Black Poly Rope into Pieces
Using the scissors, cut the black poly rope into twenty 7-inch pieces and the remainder of the rope into 5-inch pieces.
As I said above, the pieces weren’t exact, I simply measured out a piece and then used that piece to cut the rest of the pieces.
There was a lot more black poly rope (50 feet!) than white poly rope. However, it was much easier to cut, and I didn’t need wire cutters. The scissors worked well.
And really, you can customize the gnome however you want to. Mine will just give you an idea of what the gnome would look like if you used the entire 50 feet of poly rope.

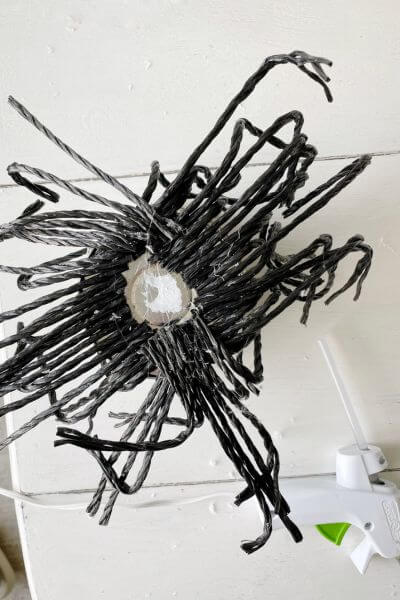
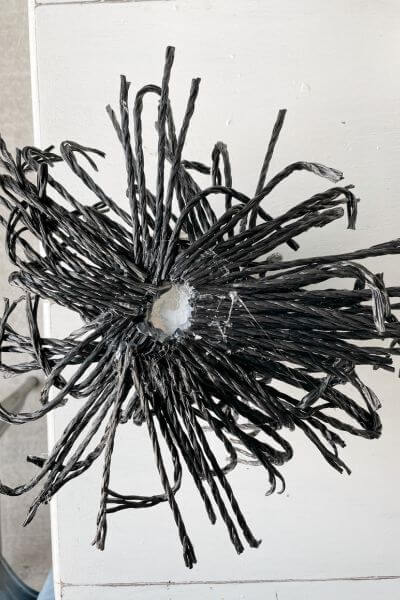
Glue the Black Poly Rope to the Bottom of the Galvanized Vase
First glue the first twenty 7-inch strands towards the front of the gnome for the beard. The seam should be in the back.

Continue hot gluing the remainder of the strands around the entire perimeter of the vase’s bottom. Fill in all the gaps.
You will be gluing some of the rope on top of the other rope as you go.
Add 5-inch strands on top of the 7-inch pieces to fill out your rope beard too!
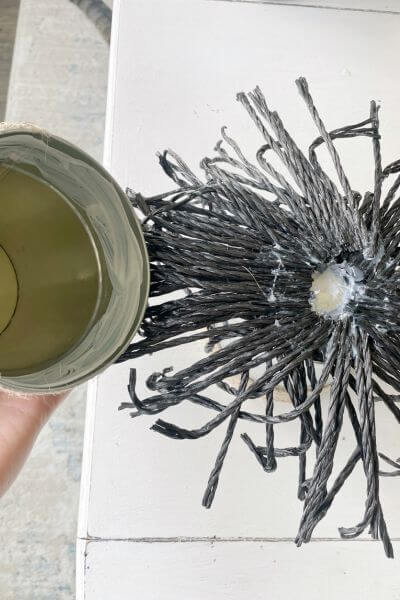
Apply Dishwasher Safe Mod Podge to the Rope Strands
After the hot glue has dried, then apply the mod podge over the top of the hot glued rope strands, as shown.
This will (fingers crossed) make this garden gnome more weather resistant!
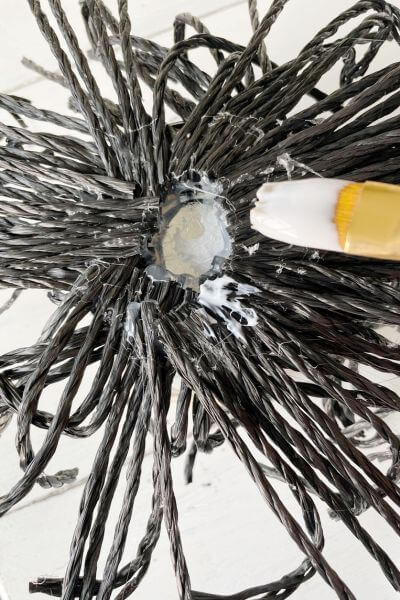

Then, simply allow the mod podge to dry.

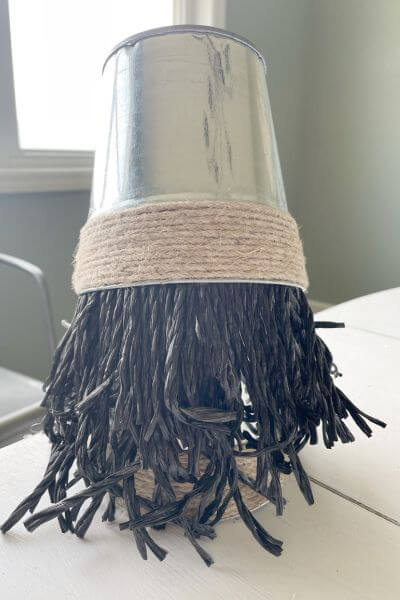
Glue the Second Galvanized Vase onto the Rope Beard and Hair
Now, take the second galvanized vase and coat the inside rim with your mod podge. Place it onto the rope beard and push it down, tilting it a little.
Keep the seam of the galvanized vase in the back. The poly rope beard that has the longer strands is in the front.

This is how this cute little garden gnome is looking so far.
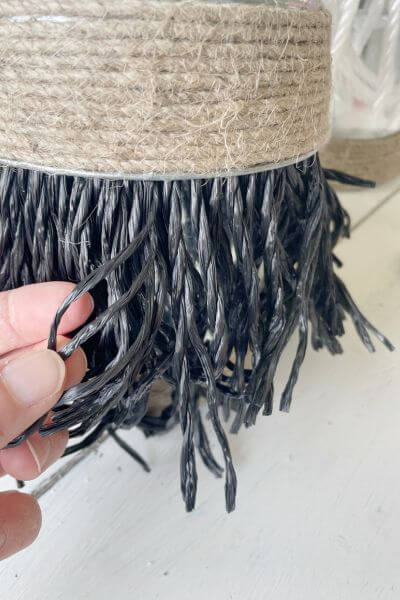
Separate the Poly Rope Strands to Make the Beard/Hair Fluffier
Separate the black poly rope using your fingers, to allow the beard and hair to be fuller and fluffier.
If the glue for the gnome hat isn’t quite dry, then be sure to hold it on while you are fluffing the rope beard.

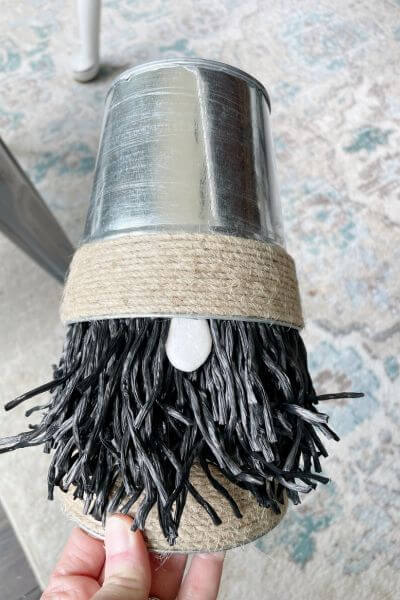
Hot Glue the White Stone to Make the Gnome Nose
Place a glob of hot glue onto the rope beard right under the brim of the hat. You may want to put some onto the galvanized hat as well.
Then grab a favorite white rock from the package and plop it onto the glue tucking it up under the hat just a bit.
I held the gnome horizontally so that the glue wouldn’t run down the beard.

Trim the gnome beard using the scissors, and your industrial-style garden gnome is completed!
Final Thoughts on Dollar Tree Garden Gnome DIY
Just a few thoughts to finish up …
Each gnome cost about 5 dollars in Dollar Tree supplies. This doesn’t include the glue gun, mod podge, wire cutters, or scissors. Not too bad for a larger-size gnome!
I plan on putting these outside to test the weather resistance of these industrial-looking garden gnomes. I’ll report back towards the end of the summer on how they do! I would expect some rust if they get wet, however, we will see!
This is a gnome craft you can do with the kids as well. My elementary school-aged daughter made her own (pic coming soon) but did complain about burning herself with the glue gun a few times. Don’t worry, nothing serious 😉
So, if you trust your kiddos with a glue gun, and don’t mind using the wire cutters to cut the white poly rope for them, I think this would be a great summertime activity to do together!
I like that they are metal, jute twine, and stone which gives them a natural, organic look as well. They will be perfect to protect your garden and outdoor spaces.
So, which one was your favorite garden gnome made with Dollar Tree materials? Do you prefer the white-bearded or black-bearded gnome? Tell me down in the comments!
As always, thanks so much for reading!
On the next Dollar Tree run, look for some galvanized vases (short or tall or both), poly rope, and river rocks, and get ready to craft one of these industrial-style galvanized garden gnomes!
Pin me on Pinterest ⬇️
