


Summer is here and the July 4th holiday is soon headed our way. So, here’s a floral patriotic wreath DIY made with Dollar Tree materials perfect for your Independence Day front door decor.
When I stopped at Dollar Tree the other day, I was browsing around the different aisles for ideas. That’s when I spotted sprigs of cute, blue Larkspur flowers.
I knew July 4th was coming up quickly, and I already had some cotton rope at home from previous adventures at Dollar Tree. So, I grabbed an 18-inch wreath, and I found a few stems of Baby’s Breath in both white and red colors.
Combine all of these items together, and I figured they could make a pretty floral July 4th holiday wreath.
Since I don’t have a lot of Independence Day decor, I thought this might be a nice touch to add to my front porch.
And really this wreath didn’t take long to put together! Which is a win!
So, without further ado, here’s the tutorial for this Dollar Tree patriotic wreath.

Supplies for Dollar Tree Patriotic Rope Wreath
This post contains affiliate links. As an Amazon Associate, I earn from qualifying purchases. This means when you click a link, I may earn a small commission at no cost to you. This helps me to run this website. Thanks in advance for your support!
All materials are from Dollar Tree except the glue gun and scissors.
The wreath materials total about $17.50 since items are now $1.25, and I had the scissors and glue gun on hand.
***Note that there are two different lengths of cotton rope at Dollar Tree. For this patriotic wreath, I used the bundles that are 11.1 feet. They are a little thinner than the other cotton rope bundles which are 6.8 feet.
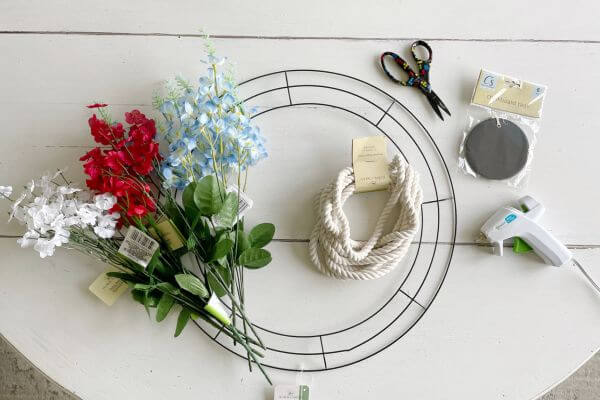
- 18-inch wreath form
- Cotton Rope 11.1 feet. (5 bundles)
- Blue Larkspur Flowers (2 stems)
- Red Baby’s Breath (2 stems)
- White Baby’s Breath (2 stems)
- Chalkboard Tag
- Chalkboard Pen
- Glue Gun
- Scissors
Clip the Leaves Off Each of the Floral Stems
First, using your scissors, cut the leaves off of each of the floral stems.

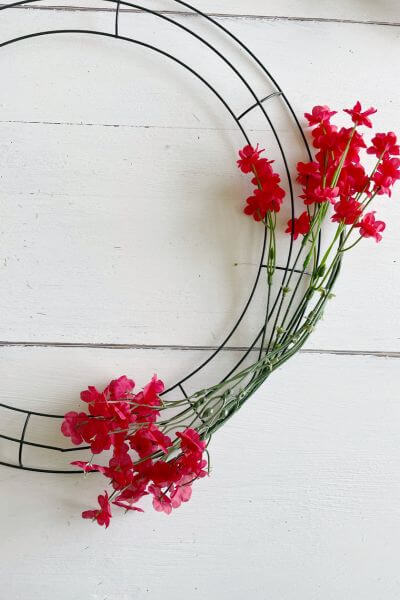
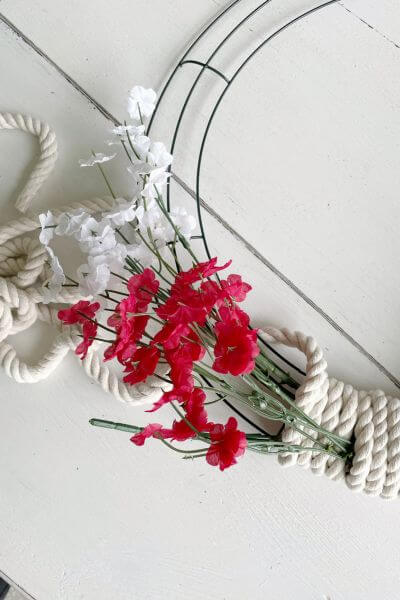
Position Two Red Baby’s Breath on Wreath Form
Next, take your 2 red Baby’s Breath stems and position them on your 18-inch wreath form.
You’ll need to bend the wire stems a little before placing them onto the wreath form.
Using your chalkboard tags as reference, make sure these first stems are in a good position on the wreath.
This is where your chalkboard tag will be positioned in the final steps of this wreath DIY.

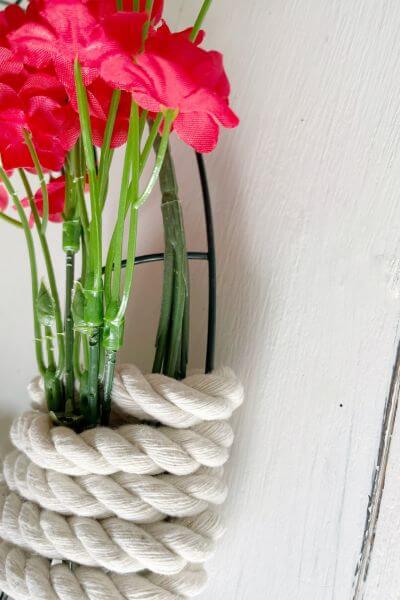
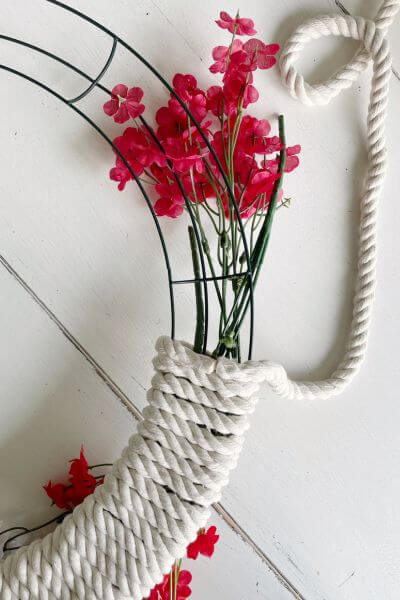
Hot Glue the Rope at the Back of Wreath and Begin Wrapping
Using your hot glue gun, glue the cotton rope at the back of the wreath and begin wrapping it around the wreath form and stems..
Wrap the rope under the flower part of the red Baby’s Breath as shown below.
However, make sure that the large central stems are covered by the rope.


The next picture is a close up of how the rope is wrapped under the floral part.
However, the rope is wrapped over the central stem (from the opposite red Baby’s Breath), so that it is covered.
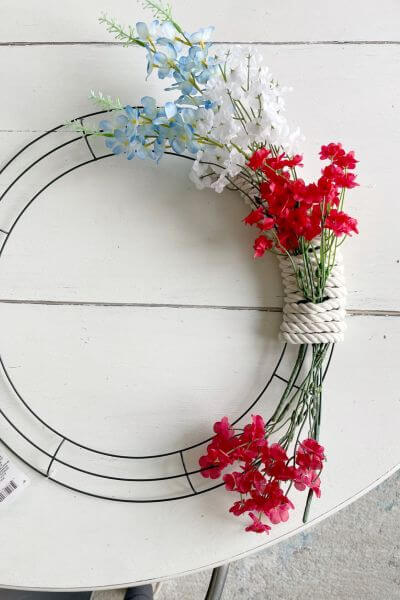
Add White Baby’s Breath to Your 4th of July Wreath
Next, you’ll tuck the white Baby’s Breath central stem down into the tunnel created by wrapping your rope around the wreath form.
Then, wrap the rope underneath the white Baby’s Breath and continue wrapping around the form.


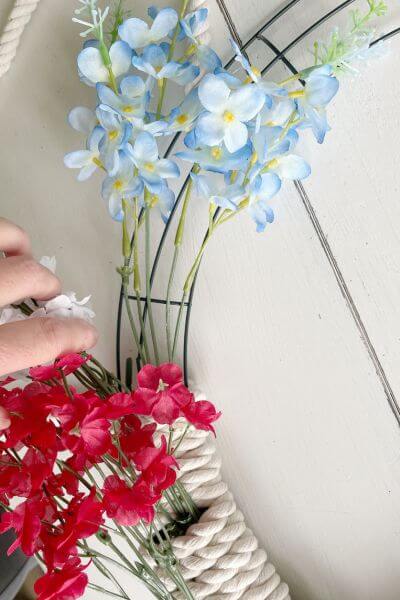
Add Blue Larkspur Flowers to the Patriotic Wreath
Now tuck the blue Larkspur flower stem down into the tunnel created by wrapping your rope around the wreath form.


As you continue wrapping your rope, wrap it under the Larkspur flower stems as shown below.
When you get to the end of the rope strand, then secure it in the back of the wreath using your glue gun.


This is how the patriotic wreath looks so far, with one side completed.
Complete the Second Half of This Patriotic Wreath
Now you’ll complete the second half of this DIY wreath. When you run out of rope, just connect another strand in the back of the wreath using the hot glue gun.
Just as before, wrap the rope around the wreath form, and then underneath the red Baby’s Breath stems.
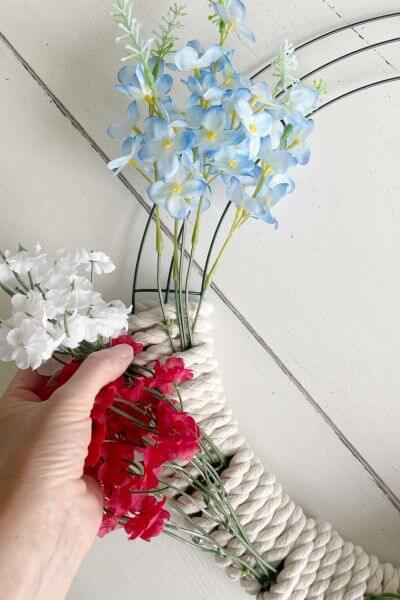
The only difference with this side of the wreath, is that you’ll have to contend with more stems.
And also, it’s a bit harder to shove the white and blue flower stems into the rope tunnel since there are already 4 stems in there.

Tuck the white Baby’s Breath stem into the rope tunnel. 🙂 Then continue wrapping the rope around, and then underneath the white flower stems.
Like I said, it’s a little bit harder to push them into the tunnel because the space is filled up. However (in the words of Adam Sandler), you can do it! 😉

Tuck the blue Larkspur flowers in and then continue wrapping the rope around the form, and then underneath the flower stems.
Once one strand is finished, just secure it in the back using hot glue. Then take the next cotton rope bundle and use hot glue to secure it to the previous strand. And then continue wrapping.


Finish Wrapping Your Cotton Rope Around the Remainder of the Wire Wreath Form
Continue wrapping the cotton rope the rest of the way around the wire wreath form. When you finish up a cotton strand, simply hot glue it in the back, Then, begin another one until the entire wreath is wrapped in rope.


This is how it looks in the back after the wreath is completed. You’ll have to shove the rope together as you complete the rope wrapping portion of this wreath.

Add Chalkboard Tag to DIY Patriotic Wreath
Get your round chalkboard tag out to add to the wreath. I looked up some different fonts and then free handed “July 4th” onto my chalkboard tag with a pencil.
After that, I traced over it with my chalkboard pen. The one from Dollar Tree is pretty thick, but it worked anyway! A paint pen would work too.
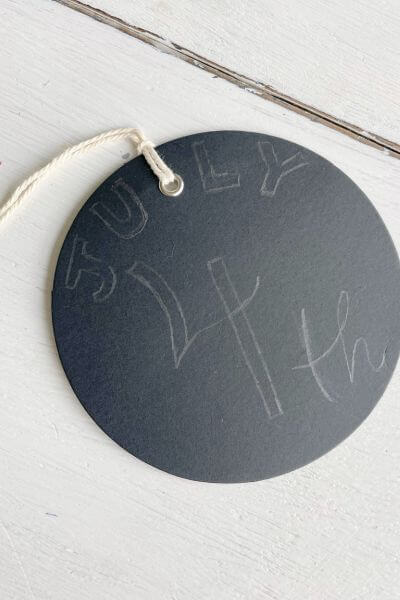

Next, simply untie the string that comes with the chalkboard tag, and then tie it onto the middle portion of the wreath.


And that’s a wrap on this Dollar Tree DIY patriotic wreath tutorial!

Here’s one more peek at it on my front door. I found some neat suction cup hooks on Amazon. Check them out if you have a glass front door! It’s been a few weeks since I put them up, and so far, they are working great!
Final Thoughts on this 4th of July Wreath DIY
Overall, I was pretty pleased with how this wreath turned out. The cotton rope is easy to work with and holds the hot glue well, so it really didn’t take that long to make this wreath.
It’s on the larger side, 18-inch diameter, so it’s great for your front door Independence Day decor. And the faux flowers lend a nice red, white and blue affect to the wreath.
For all the Dollar Tree wreath supplies, so that’s 14 items (including the chalkboard pen) at $1.25. This DIY wreath comes in at about $17.50, since I had the glue gun and scissors already. Not too bad for a rather large wreath!
And you can customize it any way you like, with different writing on your chalkboard tag, or change the color pattern of your flowers. They have a 14-inch wire wreath form at Dollar Tree too, if you’d want to craft a smaller wreath.
That’s a wrap, folks! Leave me a comment with any questions, and as always, thanks so much for reading!
Next time you’re on a Dollar Tree outing, grab some pretty flowers in red, white, and blue, cotton rope, a wire wreath form and chalkboard tag and create this pretty patriotic wreath DIY.
Pin me for Later ⬇️

Please consider subscribing to my email newsletter below for unique wreaths and DIY ideas delivered right to your inbox! 👇