

These Dollar Tree pumpkin wreath forms are an easy and budget-friendly way to spruce up your fall front door.
I’d been eyeing up these pumpkin wreath forms at Dollar Tree for a while now. Have you guys been doing this too? 😉
So, I finally brought one home and used a few other dollar store supplies to make a neutral and textured wreath that can be used on the front door.
Or, hey, just about anywhere for cozy fall home decor. You can even sit it on a shelf!
Another cool part is if you want to add a little floral pizzaz to it, this wreath makes that super easy to do.
Check out the tutorial for this easy Dollar Tree pumpkin wreath form idea.

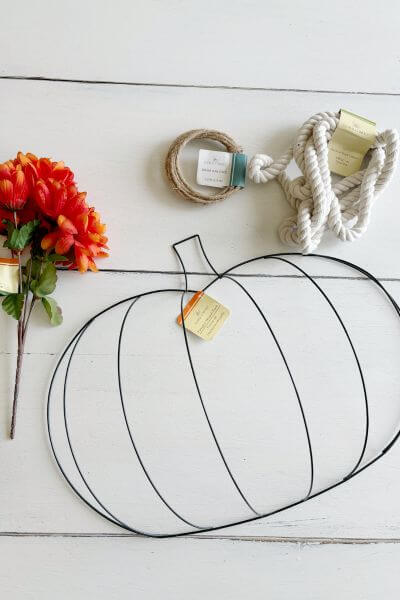
Pumpkin Wire Wreath Form Supplies
This post contains affiliate links. As a Dollar Tree and Amazon Associate, I earn from qualifying purchases. This means when you click a link, I may earn a small commission at no cost to you. Thanks for your support.
- Pumpkin Wreath Form
- Cotton Rope 6.8 feet – 6 count (read note below)
- Jute Wire 7.5 feet – 5 count
- Glue Gun
- Wire Cutters
- Floral Mums (Optional)
*** The cotton rope comes in 2 lengths/thicknesses. For this pumpkin wreath post, I used the 6.8 feet version of the rope. On the Dollar Tree website, it appears that you cannot choose the length when ordering. They send you an assortment of both lengths. Just an FYI in case you’re ordering online. Also be sure to check the tag if you’re picking the rope up in the store as well. I’m sure either size could be used, but it will affect the quantity you need for this DIY. ***
Hot Glue Jute to Front of Inner Wires
First, wrap the jute wire around the bottom of the first inner strand of the pumpkin form to secure it. The wire is strong and holds nicely!

Then, use the glue gun to hot glue the jute wire up the front of the first inner section of wreath form.


When you get to the top of the first section, wrap the wire around the form (as shown below) to secure it.

Next, wrap the jute around and around the first section, making a spiral until you get back to where you started.

Wrap the jute wire around again to secure it at the base, then cut it using the wire cutters.

Continue with the next section in the same fashion until all the inner sections are completed.

If, as shown below, the jute wire runs out in the middle of a section, simply wrap it around to the back. Then use another roll of jute wire to continue on.
The jute wire holds really quite well, so you don’t have to worry about it unravelling.

Almost there! Complete each of the inner sections of the pumpkin wreath form.

Then you’ll move on to the next step …
Cover the Pumpkin Stem with Jute Wire
Now that the inner sections are covered, we’ll cover up the stem using the jute wire again.
Starting at the back, wrap the jute wire around the stem vertically.

Continue wrapping until the stem is covered.

Here’s how to fill in each of the sides and hide the pumpkin wire form. Apply hot glue to the side where the wire form is showing.

Place a loop in the wire. Squeeze the loop shut and stick it to the hot glue. 🙂


Complete this step on the other side. Then wrap the wire toward the back of the stem and clip the wire. Finally, hot glue it to the back of the pumpkin stem.
Now the stem portion of this pumpkin wreath is completed.

Fill in the Inside of the Pumpkin Wreath with Cotton Rope
Now it’s time to fill in the middle.
At the back of the wreath form, apply hot glue along the top of the wreath form and stick the first strand of cotton rope to this.

Then double back the other way making a loop with the rope and using hot glue to secure the rope to the wreath form.

Place dabs of hot glue along the inner rungs of the wreath to secure the rope. Try to keep the globs small enough that you won’t be able to see them from the front.

Continue weaving back and forth applying the hot glue to the outer rim and inner rungs of the pumpkin wire frame.

In some of the loops I placed a dab of hot glue to keep the rope together.

Here’s how the pumpkin is looking so far. I got lucky and this rope strand ended right where the inner rung of the pumpkin form was.
If this doesn’t happen, then you’ll have to cut the rope so that the end of it is behind one of the inner rungs. This helps to hide the ends of the cotton rope.

Butt the next strand of rope up against the previous one and use hot glue to hold it in place. Then continue weaving back and forth using hot glue to adhere it to the pumpkin wreath form.

A few more pics of the process …


Cut the rope strand as needed to make sure it is behind one of the inner rungs.

In the home stretch of filling in the pumpkin wreath form with the cotton rope.


Here’s the back.

And the front.

Trim any unraveled jute strands from the bottom of the wreath.

Hot Glue Jute Wire Around Perimeter of the Pumpkin Form
Hot glue jute wire at the back of the stem.

Hot glue the jute around the perimeter of the pumpkin form covering the remaining wire.


Make a Hanger for the Pumpkin Wreath Craft
Make a loop with the remaining jute wire and twist it at the bottom.

Then glue it to the back of the pumpkin stem.

Whew! Finally done with this DIY pumpkin wreath from Dollar Tree.

That’s a lot of pictures, don’t ya think… since I don’t make videos (yet) I like to describe each step with photos.
Or do you all think this is picture overload? Tell me down in the comment section!
Optional – Add Floral Stems to the Pumpkin Wreath DIY
It’s easy to add floral stems to this wreath. I clipped the leaves off these orange mums and then tucked them between the cotton rope along the top of the wreath.
Since I haven’t decided if I like the wreath plain or with floral, I didn’t hot glue them yet.
However, I would just clip the stems short and use a bit of hot glue to stick them in between the cotton rope sections.
There’s a pretty wide selection of fall stems at Dollar Tree right now to choose from too!

Final Thoughts for this Pumpkin Wreath Tutorial
So, is this a craft you’d like to try?
The biggest takeaway is not to use too much hot glue. Because if you do, you’ll see it from the front.
The two types of rope from Dollar Tree are a nice color combination and texture, and you can add any floral that suits your style.
I thought these orange mums were festively fall, however I might just keep mine neutral right now.
Total cost for supplies (excluding floral, glue gun and wire cutters) comes out to about 15 dollars not including tax. Not too shabby for all you frugal people (like me) out there!
Any questions, please post them down in the comment section and I’ll get right back to ya.
And, as always, thanks so much for reading!
Grab your list for Dollar Tree… jute wire, cotton rope, and a pumpkin wreath form. Oh and maybe some fall floral. Then get ready to craft a pretty pumpkin wreath DIY that will go great with cozy fall decor.
Pin me on Pinterest! ⬇️

Please consider subscribing to my newsletter below for more DIY ideas 👇