


Ready to craft a chunky yarn wreath DIY that’s perfect to leave up all winter? Well, then get your glue gun fired up!
Yarn, it’s one of my very favorite items to use for crafts and wreaths. There’s just something cozy and warm about it, don’t you think?
And in this chilly season, it’s the perfect time to use yarn, isn’t it? It goes well together with all things winter…like soup and books and warm fires.
This yarn wreath didn’t come together exactly as planned but turned out alright in the end. All in all, it’s pretty simple to make once the kinks were worked out.
And it uses one of my favorite and affordable chunky yarns from Walmart…Hometown by Lion brand.
Now, let’s craft this holiday winter wreath tutorial that can be left up all season long.

Supplies for Winter Yarn Wreath with Dollar Tree supplies
- Yarn – I used 1 skein of white yarn from Dollar Tree and 2 skeins of Hometown by Lion brand Aspen Tweed chunky yarn from Walmart
- Glitter drape – Dollar Tree
- Two 18-inch wreath forms – Dollar Tree
- Two Pinecone branches – Dollar Tree
- Burlap Ribbon – Dollar Tree
- Two sets of Tree Ornaments – Dollar Tree
- Two Frosted Evergreen Picks – Dollar Tree
- Glue Gun
- Glue sticks
- Scissors
- Wire Cutters
I didn’t include a comprehensive picture like I usually do of all the supplies. This wreath was more a “make as you go” kind of project.
Glue the Wreath Forms Together
First, glue the two 18-inch wreath forms together back-to-back.
Use hot glue to adhere them. If they don’t match up or don’t stay together perfectly, no big deal.
The other supplies will help to hold them in place.


Wrap Glitter Drape Around the Wreath Form
Next, it’s time to add the glitter drape. I purchased this at Dollar Tree, but I know they have something similar at Walmart called Snow Roll.
Cut the glitter drape into pieces and then wrap them around the wreath forms. Secure the ends using hot glue.
The glitter drape was used to fill out the wreath and to hide the wire.


Wrap Regular Yarn Around the Wreath Form
Ok, so here’s where the project got a little sticky. I originally was going to use this type of yarn for the wreath but quickly realized that I would have to wrap A TON of it around there. Like many MANY skeins. No one got time for that around the holidays! Haha
I ended up wrapping the whole skein over the glitter drape. I didn’t want to unroll the whole thing again, so I left it on there.
If I had it to do over again, I would have bought more glitter drape for a little extra padding and skipped over this step since I ended up using chunky yarn from Walmart.
But here we are.
This is how it’s looking.


Wrap Chunky Yarn Around the Wreath Form
This yarn called Hometown in Aspen Tweed by Lion brand is one of my favorites. It’s kind of a cream color with brown and black flecks in it.
I had some leftover from another project. So, I began wrapping it around the wreath form. Do this in a pretty even pattern to get good coverage.
You’ll need two skeins of this yarn, because I finished up the roll I had. This is how much of the form was left to cover.


Good thing this yarn is pretty inexpensive, it currently runs around $3.50 a skein.
Finish carefully wrapping the rest of the wreath form with the new roll of chunky yarn.


I didn’t like the uniform look, so after I had the entire wreath form pretty well covered, I began wrapping it in crisscrossing patterns around the form.
Go the whole way around the wreath form this way. This doesn’t take nearly as long as wrapping it in a uniform pattern. 😅
Once that’s completed, you should have something that looks like this.


Note that I had a little bit of yarn leftover. Keep that for the next steps. Knot it in the back to secure the chunky yarn and then clip it your scissors.

Now it’s time to add a little bling. Well, neutral-ish bling I guess, for this wreath.
Hot Glue Tree Ornaments to Wreath
I found these cute white tree ornaments at Dollar Tree. They were way up high, and since I’m vertically challenged, I had to ask an associate for help.
Totally worth it though! 😉

Hot glue three of the ornaments onto the wreath. Since this is going to be covered, I picked the least attractive portion of the wreath to glue them to.
Pick a spot in the center for the first tree and poke it down into the yarn just to get an idea.
Place a glob of hot glue onto the spot and then poke the tree trunk into it.
Then, glob the hot glue all the way around the base of the trunk to give it more stability.


Add another tree to either side of the first one in the same manner, so that you have a set of three trees.


Here’s how the three trees look after they’ve all been added to this chunky yarn wreath.


Add Greenery to the Chunky Yarn Wreath
Now, it’s time to get out the two pine picks.

I used wire cutters to cut the ends off of the winter pine pics.

Place them onto the wreath to get an idea of where they look best.
Then hot glue them to the front of the wreath.


Use the remainder of the yarn to wrap around and cover up the hot glue on the greenery stems and also around the tree trunks.

We’ll add pinecones next to cover the middle.
Add Pinecones to the Front of the Winter Wreath
Grab your floral picks with the pinecones from Dollar Tree.

Clip the pinecones off the floral stems using the wire cutters.

Hot glue the pinecones to the front of the wreath covering the pine stems.

Hot Glue the Sides of the Tree to Stabilize
You can hot glue the side branches of the outer trees for a little more stability if needed.

This is how the chunky winter wreath is looking so far.

Add Burlap Ribbon to the Top – Optional
Next, you can add a burlap ribbon to the top of the chunky wreath if you want to dress it up a little more.

I found this video with the exact burlap that I had from Dollar Tree demonstrating how to make a bow. If you want to check it out, I’m linking it here.
Below are my pictures of the process.
Cross a length of ribbon in the middle.

Turn it over and pinch it in the middle.

Tie it in the middle using jute twine (also available at Dollar Tree).

Tie and knot the jute twine and then spread out the ends.


Now you can add it to the top of the chunky wreath.
I wasn’t sure I wanted the bow to be permanent on the wreath. To make it removable, I added a strip of burlap to the top of the wreath.


Then I hot glued the burlap bow to the strip of ribbon. Finally, I trimmed the ends of the bow.

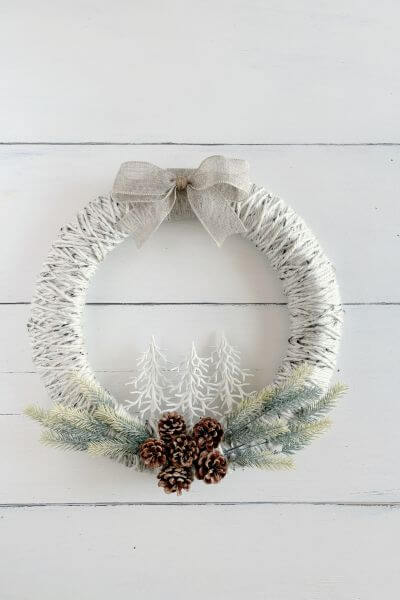
Finished Chunky Yarn Wreath DIY
Here’s this neutral winter wreath all finished.

Final Thoughts for this Neutral Winter Wreath DIY

So, what are your thoughts on this winter wreath tutorial? Do you think it’s perfect to keep up through the holidays and even in the months of January and February?
You could easily swap out the trees with the bottle brush kind that are also found at Dollar Tree.
The bases usually pull off bottle brush trees pretty easily and they would be even easier to glue into the wreath than the ornaments used in this tutorial.
I love these snowy January and February months. The world seems to get quieter and more peaceful after the hustle bustle of the holiday season.
This winter wreath using cozy chunky yarn should fit right in with all types of decor this time of year.
Any questions, please post them down in the comments. And, as always, thanks so much for reading!
Now it’s time to head out and grab a few Dollar Tree supplies and chunky yarn to make this cozy winter wreath DIY.
Pin me on Pinterest ⬇️

Please consider subscribing to my email newsletter below for more DIY ideas 👇