


All you’ll need are a few wooden house silhouettes, wood pallets, popsicle sticks, paint and a few other supplies to create this cool Dollar Tree haunted house craft that you can make with the kids.
It’s almost Halloween, you can feel it in the crispness of the air and see it in the leaves turning to pretty orange and red.
It’s no wonder this is many people’s favorite season of the year.
I remember an old Clifford book that I used to read to the kids they were smaller. All the children in the book get scared when Clifford runs into town covered in a big white sheet. And at the end, Emily Elizabeth says “it’s fun to be scared on Halloween.”
And she’s absolutely right. To our family the upcoming Halloween holiday is all about the spooky fun.
That being said, it’s time for a DIY Dollar Tree Halloween decoration that you can make with your kids.
Below is a view of both sides of this finished Halloween craft project!


Supplies for DIY Haunted House Dollar Tree Idea
This post contains affiliate links. As a Dollar Tree and Amazon Associate, I earn from qualifying purchases. This means when you click a link, I may earn a small commission at no cost to you. Thanks for your support.
- 2 wooden house silhouettes
- 2 wood pallets
- 2 packs of craft sticks
- Paint – Black, white (antique parchment) and grey (timeless grey)
- Gorilla wood glue
- Craft paintbrush
- Vellum
- Halloween wood stickers

Paint the Haunted House Craft Silhouettes
First thing to do is grab the kiddos and paint these haunted house wood silhouettes. The two wood pallets were also painted in the same way.
We painted them an off-white color first called Antique Parchment using cheap chippy brushes found at Walmart.

You can see how the brush makes textured lines on the wood.

Allow the off-white paint to dry.
Next, using a color called Timeless Grey, I taught the kids how to dry brush this grey color on the house.
Dry brushing is simply dipping the brush in the paint, and then blotting most of it off onto a paper towel. Then lightly brush it onto the house and pallets using vertical strokes.


When you paint them, be sure that the sides that are painted will match up when you glue the house together.
As you can see in picture, the doors are on opposite sides, so when they are turned around to meet each other the silhouettes will match up. (Ask me how I know this) 😉

Let the Kids Draw Spooky Pictures on the Vellum
Next, it’s time to draw on the vellum. Secure the vellum onto the back of the houses with painter’s tape.

Trim the vellum so that it doesn’t stick out around the house form. Then trace around the windows and door using a pencil.


Pull the vellum off the house and secure it to a binder or clipboard with the painter’s tape.
Now it’s time to have the kids draw some spooky creatures and ghosts in the windows. We drew them with a pencil, however if you want a darker picture, you could try using a pen.

After the drawings are finished, re-secure the vellum to the inside of the house form with the painter’s tape.


Repeat the process with the other wooden house silhouette.
Assemble the 2 House Silhouettes and the Wood Pallets
Create the walls of this haunted house by gluing the wood pallets and wooden house forms together. I used gorilla wood glue and a small craft paintbrush to apply the glue.
First apply glue along the edge of the wood pallet and then secure it to the inside edge of the wooden house form. You may have to trim the vellum a bit so you can glue it directly onto the wood.
Apply the second wood pallet along the other side. Make sure the bottom of the pallet is flush with the bottom of the house.


Apply the wood glue along the other edge of both pallets.

Then position the other house form on top of the pallets creating the walls of the haunted house.

The sides of the house are now complete!

Add the Roof to this Dollar Tree Haunted House Craft
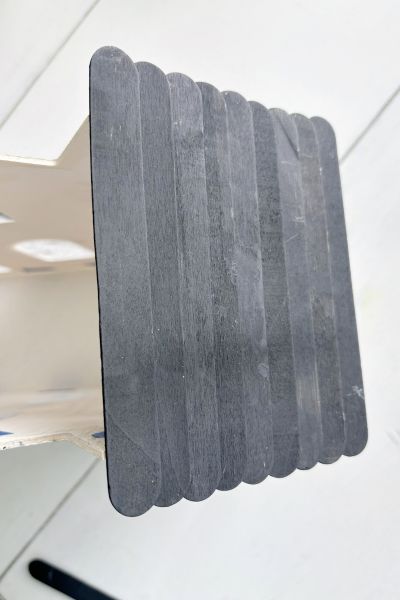
Next, it’s time to add the roof using those popsicle sticks.
Paint the front, back and sides of the popsicle or craft sticks.

Starting at one side of the house, get an idea of how many craft sticks you’ll need. Place wood glue along the edge of the popsicle sticks to glue them together.
Add more as needed. I’ll give you an idea of how many I used for each roof section at the end of the post.
These sticks sometimes get warped or bendy. As best you can, bend them straight and then glue them together.
I sometimes placed a heavy object like a glass on top of them as they dried which helped to straighten them out too.


Allow the section of shingled roof to dry.
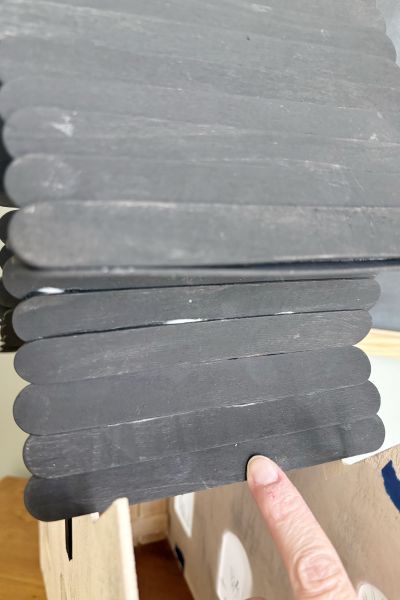
Place glue along the top edge of the roof section that you’re gluing the popsicle stick shingles to.

Then place the shingle roof section onto the first part of the roof. You may have to hold it in place for a minute while the glue adheres to the shingles.
I used another popsicle stick on the other side to see where the section should be best positioned.
After gluing the next section of shingles together, glue them to the roof.

Work in sections along the housetop until the roof is completed.

When you get to an underside section, you may have to hold it on a little longer until the glue sticks.

Almost there!
Whew. Ok so the roof is now completed, time to add the shutters …
Add Shutters to the Haunted House Craft
Now take a black popsicle stick and at each window, see how long you need to make each shutter. I just eyeballed each one.

Then cut it off with a sharp pair of scissors.

Cut it in half with a pair of scissors.

Now you’ll have both sides of your shutters. I cleaned them up by painting the raw edges black. They don’t have to be perfect since this is a haunted house. 😉

Use wood glue to stick them to both sides of the window.

Repeat this with each window. And then use wood scraps to glue around the door.
This is how the miniature haunted house is looking so far.

And the other side.

Going from left to right using the picture above the amount of popsicle sticks that I used on each section of the roof are as follows: 9, 3, 3, 3, 3, 9, 9, 3, 3, 3, 3, 9. So basically, on the longer sections, I used 9 popsicle sticks and the small sections I used 3.
Add Wood Stickers to Decorate the Miniature Haunted House
These wood stickers were found at Dollar Tree. Perfect to cover up that little hole at the top of the house.
We bought two packs of stickers, one for each side of the haunted house.

Paint the bats black to fit in with this haunted house motif.

Then we simply used some of the stickers to decorate the houses. The witch stickers were placed at the top to cover the holes.
These stickers have round sticky tabs on the back that weren’t holding well, so we took those off and used wood glue to glue them to the houses.


And here’s the night view of both houses. I placed two battery operated tea light candles underneath this mini haunted house.


Finishing Up This Dollar Tree Haunted House Craft
So, what do you think of this haunted house DIY from Dollar Tree that you can make with the kiddos?
All the supplies are from Dollar Tree except the gorilla wood glue, craft paint and vellum. And if you don’t want to purchase a pack of vellum, parchment paper might be a good substitute.
It’s nice that the kids get to customize the house by drawing on the vellum for the windows and door.
I had trouble getting them to help with the roof, but they were reasonably happy to help with the rest of this project. 😉
My teen did comment…”It seems like you’ve been working on that a long time (the roof), maybe you should simplify the process.”
And my husband said…”Did you draw those pictures?” Lol
But overall, the project was fairly simple and fun to make for Halloween!
And it’s easy to light up by placing battery operated votive lights underneath the house!
Any questions, please post them down in the comments. And, as always, thanks so much for reading!
Grab two wood house silhouettes, craft sticks, and wood pallets next time you’re at Dollar Tree and get ready to craft this spooky miniature haunted house with the kids!
Pin me on Pinterest! ⬇️

Please consider subscribing to my email newsletter below for more DIY ideas 👇