


This is a quick and easy tutorial for handmade air-dry clay coasters with mushroom prints. These hand-crafted coasters are great to make as a family!
The idea for these coasters came to me as I was working with air dry clay to make wall pockets. (If you’re interested in that tutorial, I provided the link)
I had a little table in my living room that I had stripped and refinished and coated with wax. Well, my family, instead of grabbing a coaster, plopped their drinks right onto my table.
Wax is great but has a hard time resisting water that’s been sitting on it for a while. As you might have guessed, there were circles all over my table.
I took it out the garage and it took quite a few runs with the sander to get rid of the circles. I ended up recoating it with another topcoat.
However, I also read my family the riot act and educated them about water and wax. I then decided to make them some coasters to use and since I had air dry clay already on hand, it worked out perfectly.
So guys, let’s make some coasters together! You can even recruit your family so that everyone can make their own designs!
This post contains affiliate links. As an Amazon Associate, I earn from qualifying purchases. This means when you click a link, I may earn a small commission at no cost to you. Thanks in advance for your support.
Supplies for Air Dry Clay Coasters
Long list, but you all probably have lots of this stuff on hand. And they are so easy to make!
- Air Dry Clay
- Rolling Pin
- Template
- Parchment Paper
- Mushroom Stencils
- Scissors
- Mod Podge
- Paintbrush
- Stamp Pad
- Butter Knife
- Cabinet Bumpers (pictured later in post and purchased at Walmart)

Roll Out the Air Dry Clay
First things first, grab a blob of air dry clay and place it onto your parchment paper.

Grab another piece of parchment paper and place it over the top, then roll out the clay using the rolling pin.
You want to roll it out to about 1/4 inch thick. Make it as flat as possible so that glasses and cups sit nicely on your coaster.

Cut out the free square template and place it onto the clay. If you use the template your coaster will measure about 3.75 inches by 3.75 inches.
Alternatively, you can use a large glass and press it onto the clay to create a round coaster.

Using the butter knife, cut out around the square template. We will smooth out the edges in the next step.

Here’s the clay coaster cut out into a rounded square shape.

Dip your finger into a bit of water, and run it all the way around the edge, smoothing out any sharp corners.

Now that you have the clay coaster shape that you want, it’s onto the next step.
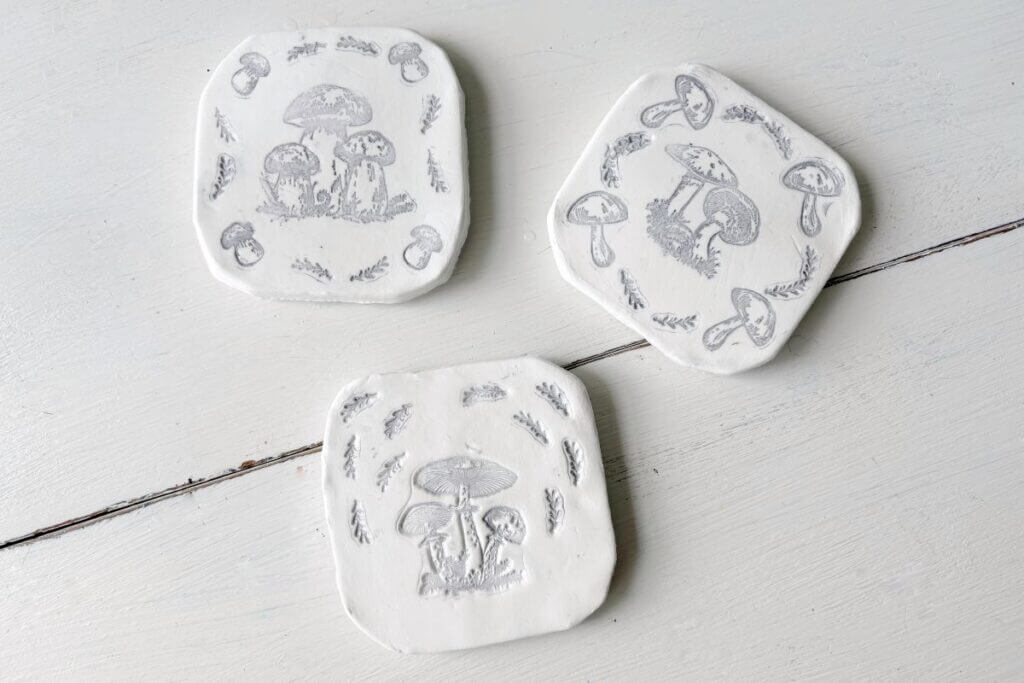
Use Mushroom Stencils to Add Designs to the Coasters
Now, we’re going to add some designs to the clay coasters.
Time to get out the mushroom stencils and ink pad.

Pick out a design and start creating. Gently press the mushroom stencil onto the ink pad, and then press it onto the clay coaster.

Try to get the mushroom print, but not the edges of the stencil, onto the coaster.

Continue with the mushrooms you chose, making your design.

As you can see, I was a little heavy handed with the leaf designs in some spots. 😅

Allow the clay coaster to dry. I placed mine on a cooling rack and it took about 3-4 days to completely dry.

Once Dry, Coat the Coasters with Mod Podge
I gave the coasters 2 coats front and back with mod podge. I allowed each coat to dry about an hour between coats.

Apply 4 Cabinet Bumpers to the Bottom of the Coaster
After the coats of mod podge dried fully (about 24 hours), I picked up cabinet bumpers at Walmart to apply to the bottom of the coaster as shown.

Here’s the completed air dry clay coaster!

Everyone in the family made a different design for their coaster. 🙂 Some were more minimalistic and some went all out.

And a pic of them stacked up. They definitely have a homemade vibe!

Final Thoughts on Air Dry Clay Coasters DIY
So, is this a project you’d try out? I’m really loving clay crafts right now so this was right up my alley!
Couple tips… Make the coasters as flat as possible so that your glasses and cups can sit on there steadily.
If you’re not a fan of the edges being irregular, be sure to smooth them out as much as you can before allowing the coaster to dry.
Also, I’m considering spraying these with a water resistant sealer to give them a little more durability with wet drinkware.
If you’re not a fan of the black and white effect of the stamp pad, you could add paint to the design before applying the mod podge.
I’ve been seeing a lot of mushroom decor out and about, so these coasters fit right in!
Any questions leave me a message down in the comments! And, as always, thanks so much for reading
So, are you ready to head out and grab air dry clay and mushroom stencils to craft these easy air dry clay coasters for your own coffee table? I thought so!
Pin me on Pinterest ⬇️

Please consider subscribing to my email newsletter below for more DIY ideas 👇